Simple
Weld
Step 1:
After electrical connection pins are inserted (see Stripping
Overview), the welding area and the Powercore Welding Rod must be wiped clean
of any dirt and contaminants. We highly recommend 97% pure isopropyl alcohol,
as it is a pure cleaner that leaves no residue. Acitone, Varsol, or other industrial
cleaners are NOT recommended.
Remember; plastic can oxidize, as steel can rust. It is also recommended that
the area be scuffed with a light sand paper or abrasive cloth to remove this
oxidized layer. This will ensure a very strong bond.
Note: Your hands have dirt and oils on them. Touching the Powercore, and weld
area after they have been cleaned may re-contaminate.

Step 2:
Powercore Welding Rod is positioned, and pre-attached to the bottom
part.(see Positioning Powercore)
Note: Cleaning Powercore and weld area after it has been attached to
part, is recommended and can save time.

Step 3:
The parts are aligned and clamped together.
(see Clamping
Thin Plastics)

Step 4:
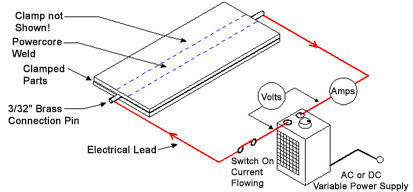
Once positioned and clamped, the electrical leads are connected, and
the power supply is turned on for a pre-determined amount of time
to allow parts to thermally fuse together.
Note: After the power supply is turned off, the parts should remain
clamped together until weld area cools.(1 to 3 minutes depending on
thickness).


A section 0.060" (1.53mm) thick HDPE sheet matirial welded with
Powercore Welding Rod.
For easy reference, we have provided all the above information in PDF
format for you to download.
|


